Author: admin

  • Learn Simulations in Blender’s Geometry Nodes: A Step-by-Step Tutorial

    Learn Simulations in Blender’s Geometry Nodes: A Step-by-Step Tutorial

    Blender’s Geometry Nodes offer powerful tools for creating dynamic simulations, from particle systems to complex interactions. In this blog, we’ll break down a two-part tutorial series that teaches you how to build simulations using Geometry Nodes. Whether you’re a beginner or looking to expand your skills, this guide will walk you through the essentials.


    Part 1: Basic Simulation Setup

    Watch Part 1 Here

    Key Concepts Covered

    1. Simulation Zones

    • Start by creating a simulation zone to track changes over time.
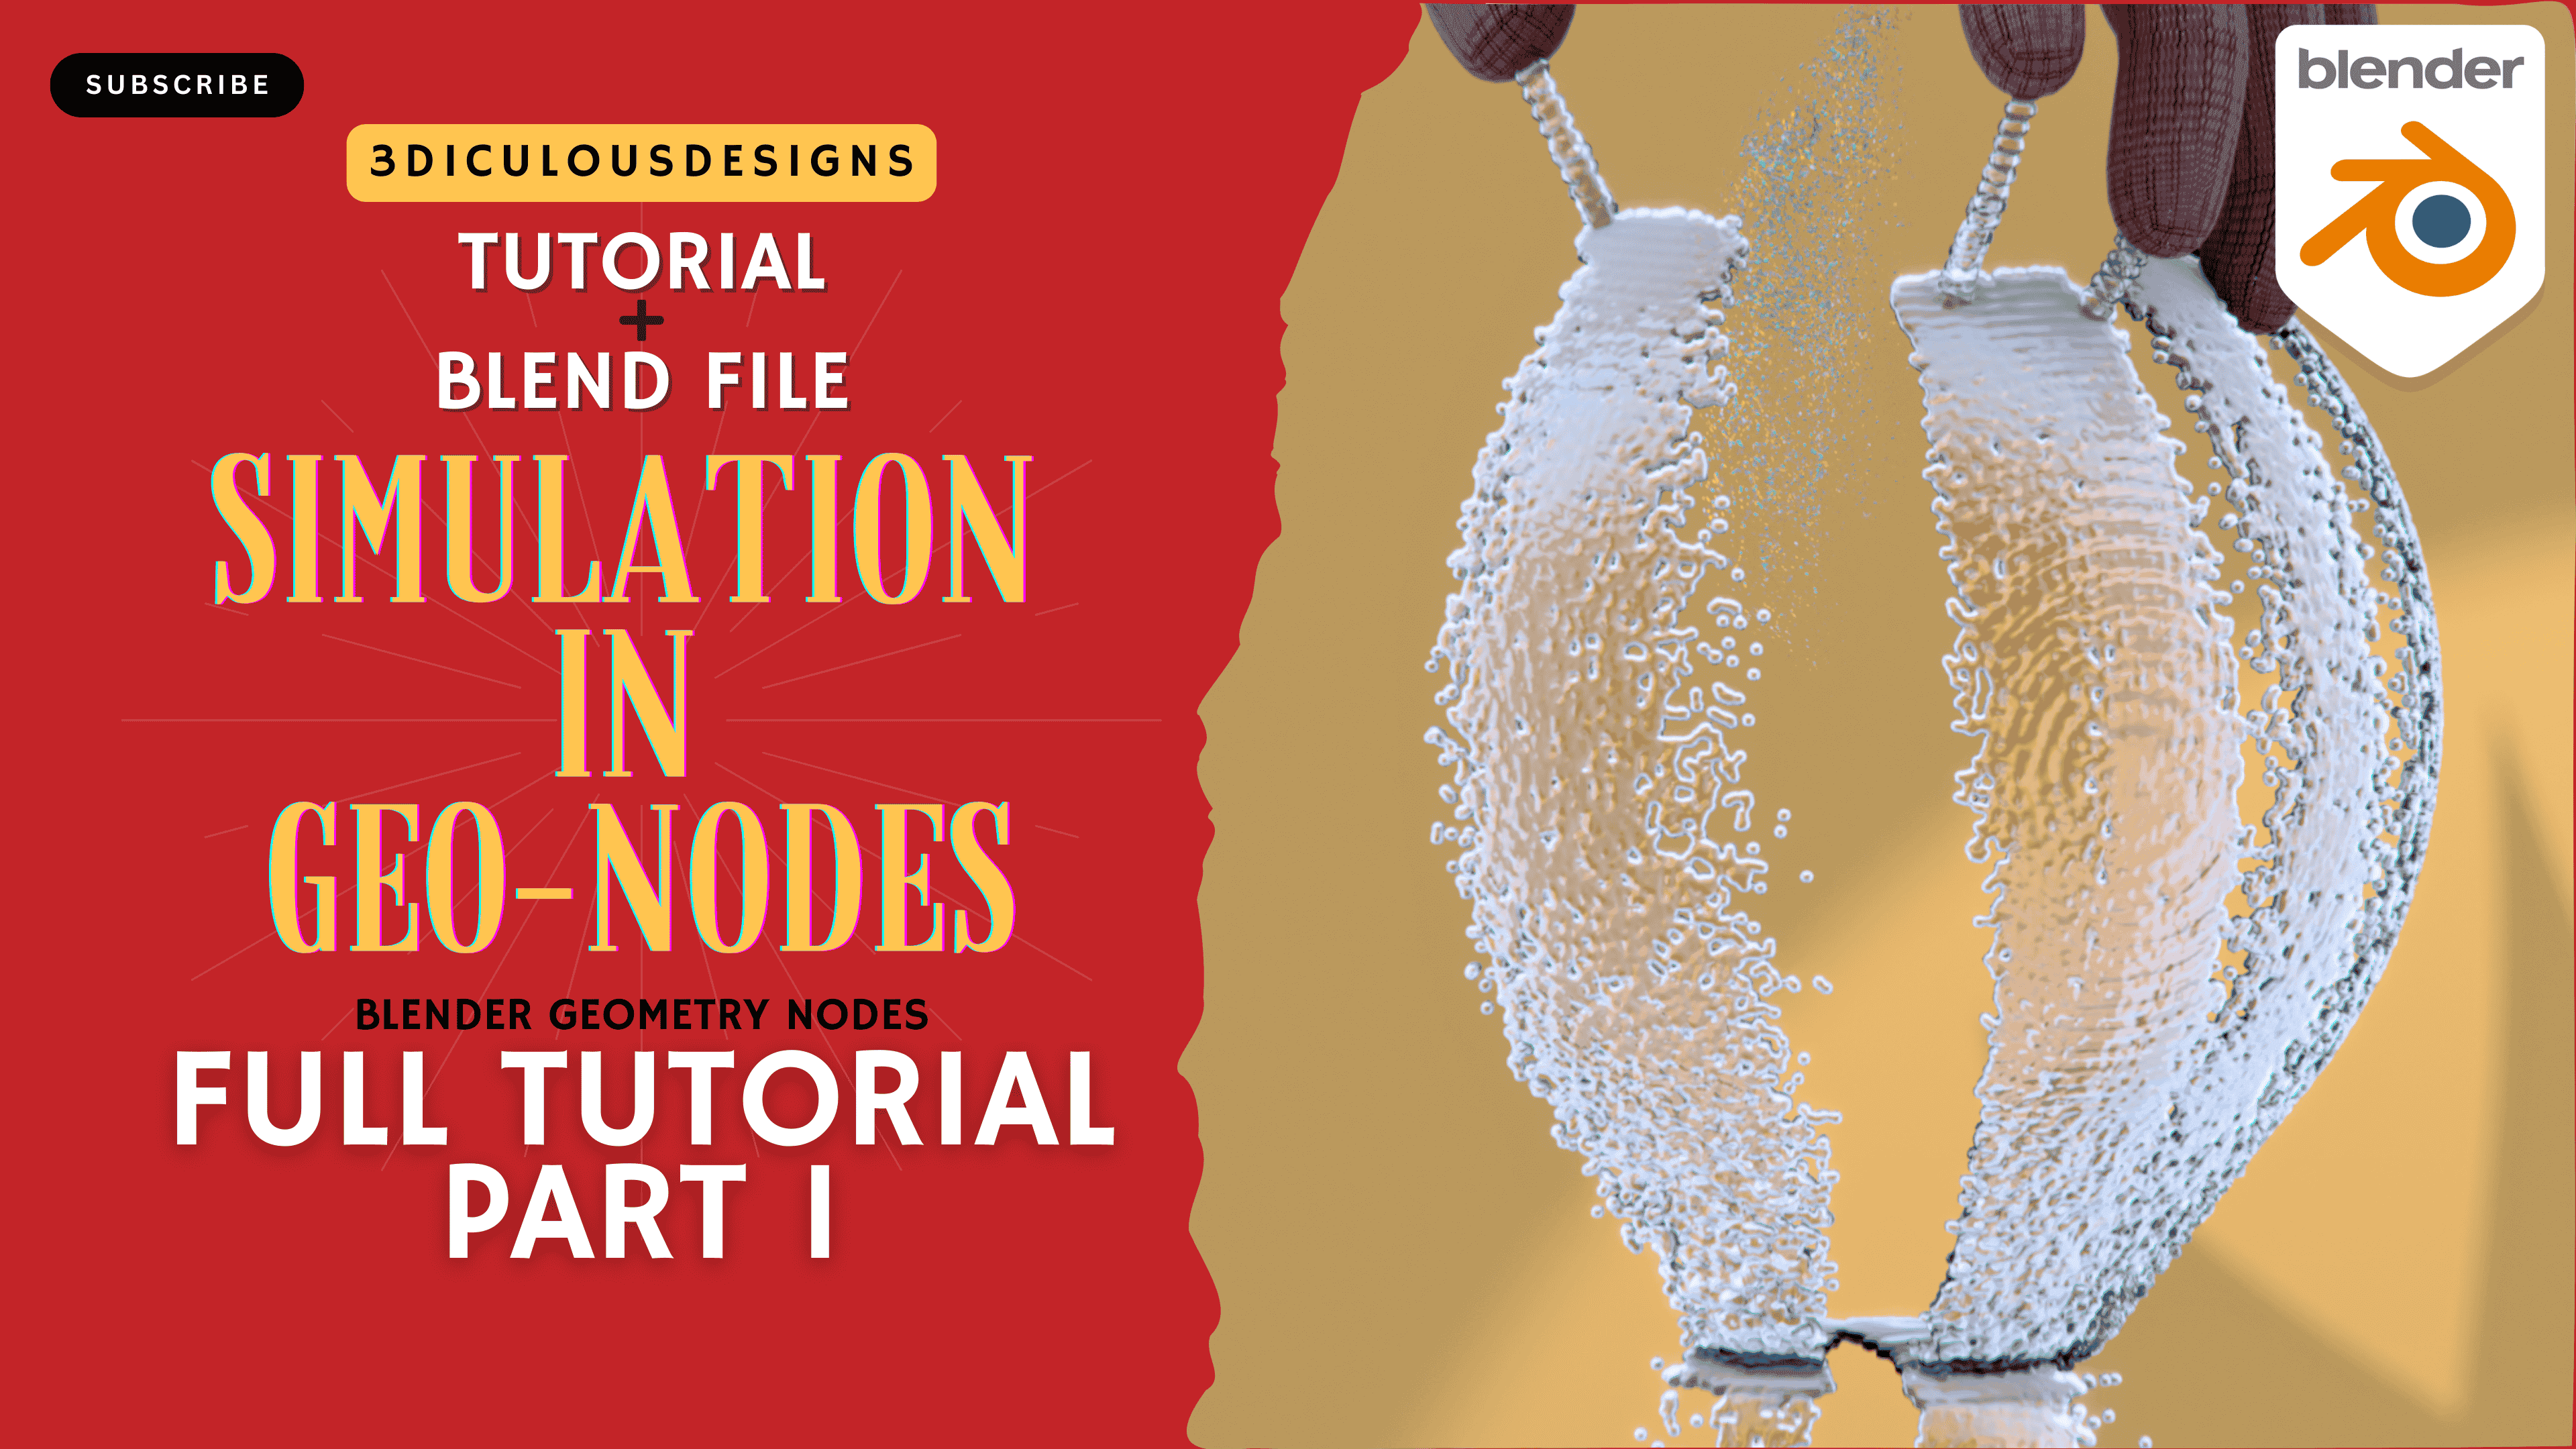
    • Use Distribute Points on Faces to generate points on animated finger meshes. Adjust density to ensure consistent coverage.

    2. Attributes and Initial Velocity

    • Store attributes like initial_velocity to control particle direction.
    • Calculate velocity using normals (direction of fingers) and add randomness with Random Value nodes.

    3. Forces

    • Control Point Attraction: Use an Empty object as an attractor. Calculate distance between particles and the Empty to create a pull force.
    • Gravity: Add a downward force using a constant vector (e.g., (0, 0, -9.8) scaled by Delta Time for realism).

    4. Collisions

    • Sample the nearest surface position and normal of collision objects (e.g., a sphere).
    • Reflect particle velocities using Dot Product to simulate bounce effects.

    5. Attribute Updates

    • Continuously update velocity by reducing it over time (e.g., multiply by 0.99 per frame for drag).

    Part 2: Advanced Effects and Scene Building

    Watch Part 2 Here

    Key Concepts Covered

    1. Particle Lifetime

    • Create an age attribute to track how long particles exist.
    • Delete particles after a randomized lifetime (e.g., between 30–250 frames) for organic behavior.

    2. Turbulence and Randomization

    • Add Random Value nodes to velocity for chaotic motion.
    • Use Noise Texture or Vector Math to create swirling effects.

    3. Disintegration Effects

    • Convert character meshes to particles using Dual Mesh and Split Edges.
    • Apply outward forces along normals and use Simulation Zones to animate disintegration.

    4. Shading Based on Age

    • Map the age attribute to a Color Ramp for dynamic color transitions (e.g., red to blue as particles age).
    • Use Emission Shaders for glowing effects.

    5. Scene Composition

    • Add colliders (e.g., UV spheres) and animate them to interact with particles.
    • Use Array Modifiers and Subdivision Surface to create complex structures.

    Pro Tips for Success

    • Experiment with Values: Adjust force strengths, randomness, and lifetimes to achieve desired effects.
    • Optimize Performance: Reduce particle counts during testing; increase them for final renders.
    • Layer Forces: Combine multiple forces (attraction, gravity, turbulence) for realistic motion.

    Practical Applications

    • Create liquid-like flows, smoke, or magical effects.
    • Simulate debris for explosions or environmental interactions.
    • Animate abstract art using dynamic particle systems.

    Conclusion

    Blender’s Geometry Nodes open endless possibilities for simulations. By mastering attributes, forces, and collisions, you can bring static models to life. Follow the video tutorials for hands-on guidance, and don’t hesitate to experiment!

    Share your creations on social media and tag the instructor—subscribe to tactiq.io for more Blender tutorials!


    Happy simulating! 🎨✨

  • Procedural UV Unwrapping Tool in Blender with Geometry Nodes: A Step-by-Step Guide

    Procedural UV Unwrapping Tool in Blender with Geometry Nodes: A Step-by-Step Guide

    Welcome to WordPresUV Unwrapping for Procedural Models in Blender using Geometry Nodes: A Step-by-Step Guide


    If you’re like me, and you like to model as much as possible inside Blender’s powerful geometry nodes, then you need to UV unwrap those shapes, procedurally. There are several methods available, this step-by-step tutorial covers UV unwrapping for models derived from splines, meshes, and complex shapes that one generates or simulates in Geometry nodes. The free tutorial is available on youtube, watch now and if my approach helps you, then please consider hitting the subscribe button.


    What is UV Unwrapping and Why Does It Matter?

    UV unwrapping is the process of flattening a 3D model’s surface into a 2D space, allowing textures to be applied accurately. It’s a crucial step in 3D modeling, it ensures that the materials, textures, and patterns are applied and scaled correctly on a 3D surface. Blender already has powerful inbuilt tools for UV unwrapping if you’re creating using Edit mode. Blender’s geometry nodes also offers the tools needed to build a UV Unwrap by connecting the right nodes. But if you’re working on a large scene with many procedurally generated meshes, you’ll have to build it for each object, that can be tedious.

    That’s where UV Unwrapper comes in! This powerful node group aids your procedural workflows inside geometry nodes. It’s a tool to making UV unwrapping faster, more efficient, and adaptable to any model. In this tutorial, we’ll show you how to master UV unwrapping using Geometry Nodes, so you can save time and create stunning textures with ease.


    What You’ll Learn in This Blender UV Unwrapping Tutorial

    In this tutorial, we dive deep into creating a procedural UV unwrap node using Geometry Nodes. Here’s a sneak peek of what you’ll discover:

    1. Creating a UV Unwrap Node from Scratch
      Learn how to build a custom UV unwrap node that can be applied to any geometry in Blender. This tool will save you time and effort, especially when working with complex models.
    2. Working with Curves and Meshes
      We’ll show you how to handle meshes generated from curve circles, and spirals, and how to convert them into meshes with proper UV mapping. You’ll also learn how to fix common issues like stretching and overlapping UVs.
    3. Advanced Techniques for UV Mapping
      Discover how to use Capture Attribute and Store Named Attribute nodes to store and manipulate UV data. We’ll also cover how to handle edge cases, such as filling caps and reversing profiles.
    4. Creating Reusable Node Groups
      One of the best parts of this tutorial is learning how to turn your UV unwrap setup into a reusable node group. This means you can apply the same workflow to any project with just a few clicks!
    5. Real-World Applications
      See how this technique can be used in real-world projects, such as creating leaves, flower baskets, and architectural elements like railings and roofs.

    Why This Blender UV Unwrapping Tutorial is a Game-Changer

    • Procedural Workflow: Say goodbye to manual UV unwrapping! With Geometry Nodes, you can create UV maps that adapt to any changes in your model.
    • Reusable Tools: Once you’ve built your UV unwrap node group, you can use it across multiple projects, saving you hours of work.
    • Versatility: Whether you’re working with curves, meshes, or complex shapes, this technique works for almost any geometry.
    • Grouping: You can try to throw in objects with similar topology to go through a single UV Unwrap node, and with the right settings it’ll do the unwrapping nicely. But only if the signed/ unsigned angle is similar for the group objects coming in through a Join Geometry.

    Watch the Full Blender UV Unwrapping Tutorial

    Ready to dive in? Watch the full video tutorial to see these techniques in action and follow along step-by-step. By the end of the video, you’ll have a powerful UV unwrap tool that you can use in all your Blender projects.

    👉 Click here to watch the full tutorial now!


    Who Is This Blender UV Unwrapping Tutorial For?

    • Beginners: If you’re new to Blender or Geometry Nodes, this tutorial will guide you through the basics and help you build a solid foundation.
    • Intermediate Users: Take your skills to the next level by learning advanced UV unwrapping techniques.
    • Professionals: Streamline your workflow with reusable node groups and procedural tools.

    Join the Blender Community

    The assets and tutorials I share are the ones that help me in my own creative and professional workflow. This image is why I built this node tree. This is a scene done fully inside a single geometry nodes tree, and as such needed individual unwrapping for every object. This is what UV Unwrapper was built to do.

    If you found this tutorial helpful, don’t forget to subscribe to our channel for more Blender tips, tricks, and tutorials. We’ll be dropping another in-depth Geometry Nodes tutorial soon, so stay tuned!


    Final Thoughts on UV Unwrapping in Blender

    UV unwrapping doesn’t have to be a headache. With Blender’s Geometry Nodes, you can create procedural UV maps that are flexible, efficient, and easy to use. Whether you’re working on architectural visualizations, game assets, or organic models, this tutorial will give you the tools you need to succeed.s. This is your first post. Edit or delete it, then start writing!

  • Reverie in Blender: A Guide to Geometry Nodes, Animation, and Scene Composition

    Reverie in Blender: A Guide to Geometry Nodes, Animation, and Scene Composition


    Create a Magical 3D Scene with Blender Geometry Nodes

    Are you ready to dive into the mystical world of 3D design? In this step-by-step Blender tutorial, we’ll craft an enchanting urban legend scene inspired by an old Sufi mystic’s tale. Using Geometry Nodes, particle systems, and creative material setups, you’ll learn how to bring swirling cloth, dancing trees, and a trance-induced character to life. Perfect for beginners and young artists, there is also a video series that breaks down complex tools into simple, creative steps. Let’s get started!


    Part 1 – Crafting the Mystic Character with Geometry Nodes

    Setting Up the Base Structure

    1. Starting with Curves: Begin by creating a curve line in Blender. Resample it to 3-4 points to form the skeleton of your character’s robe.
    2. Arc Adjustments: Use an Arc Node set to 180 degrees to shape the curve into a semicircle. Adjust the radius and position to create a flowing silhouette.
    3. Noise for Realism: Add a Noise Group (pre-built or custom) to introduce natural wrinkles and movement to the cloth. Adjust the scale and detail to mimic fabric folds.

    Animating the Cloth

    1. Slow-Motion Effect: Lower the frame rate to 15 FPS and extend the animation timeline to 250 frames for a dreamy, slow-motion swirl.
    2. Rotation Keyframes: Use Transform Nodes to animate rotations. Keyframe the Z-axis rotation from 0 to 180 degrees for a hypnotic spin.
    3. Dynamic Simulation: Combine Capture Attributes and Float Curves to control how different parts of the cloth react to movement (e.g., wider sleeves sway more).

    Designing the Hands and Turban

    1. Hands from Curves: Create finger-like shapes using Quadratic Bezier Curves. Instance them symmetrically using Repeat Zones and adjust rotations for a natural grip.
    2. Turban with Spirals: Build a turban using two mirrored Spiral Curves. Use Curve to Mesh nodes and adjust radii to create layered cloth effects.
    3. For More details on Part 1, please refer the full video series.

    Part 2 – Building the Enchanted Environment

    Distributing Trees and Grass

    1. Tree Placement: Use a Grid Node with a Noise Texture to scatter trees dynamically. Exclude areas near the character using Proximity Nodes.
    2. Grass Blades: Design grass using Curve Lines with randomized height and rotation. Instance them across a plane with Distribute Points on Faces.

    Particle Systems for Falling Leaves

    1. Leaf Particles: Generate points above the scene, animate them falling with gravity using Set Position Nodes, and instance simple leaf meshes.
    2. Random Motion: Add Noise Textures to the X and Y axes for unpredictable leaf flutters.

    Materials and Lighting

    1. Cloth Material: Mix Voronoi Textures for a woven fabric look. Use blue and maroon color ramps for depth.
    2. Ground Texture: Apply a PBR Texture to the terrain and blend it with green/brown grass materials.
    3. Moody Lighting: Use a Sky Texture with warm tones. Add invisible Reflector Planes to bounce light onto darker areas.
    4. For More details on Part 2, please refer the full video series.

    Final Touches: Compositing and Rendering

    Depth of Field and Fog

    1. Cinematic Blur: Enable Depth of Field on the camera and link it to an Empty for focus control.
    2. Atmospheric Fog: Add a Volumetric Cube with low density to create a hazy, magical ambiance.

    Compositor Tricks

    1. Glow and Bloom: Use the Glare Node set to “Fog Glow” for an ethereal highlight on the mystic’s robe.
    2. Color Grading: Adjust contrast and saturation with Color Balance Nodes to enhance the surreal vibe.

    Conclusion & Resources

    By now, you’ve transformed Blender’s Geometry Nodes into a storytelling tool! Experiment with different noise patterns, animation speeds, and materials to make the scene your own.

    Pro Tips for Beginners:

    • Avoid “node spaghetti” by grouping frequently used nodes (e.g., Noise Groups).
    • Use Ctrl+T to quickly add textures in the Shader Editor.

    Download the Project File: Grab the full Blender scene, including materials and node setups, on Gumroad.

    Explore More Tutorials:


    Stay Connected!

    Follow us on Instagram for daily Blender tips, and subscribe to our YouTube channel for in-depth tutorials. Got questions? Drop a comment below – we love helping budding artists!

    With creativity and patience, you’re now equipped to turn urban legends into breathtaking 3D art. Happy blending! 🌟

    Subscribe to the YouTube Channel for more tutorials


  • Blender Tutorial: Crafting a Winter-Themed Diorama with Geometry Nodes

    Blender Tutorial: Crafting a Winter-Themed Diorama with Geometry Nodes

    Create a Magical Winter Scene in Blender Using Geometry Nodes

    If you’ve ever wanted to design a cozy winter wonderland in Blender, this step-by-step tutorial is your gateway to mastering Geometry Nodes. Perfect for beginners and intermediate users, we’ll break down how to build a frosty diorama complete with snowy landscapes, rustic windows, flickering bonfires, and intricate details—all using Blender’s powerful procedural tools. If you want to watch the full video tutorial, the series can be found on this link on Youtube.


    Why Geometry Nodes?

    Geometry Nodes are Blender’s answer to procedural modeling, allowing you to create complex scenes without manually sculpting every detail. For winter scenes—where repetition (like snowflakes or trees) and natural randomness (like terrain) are key—Geometry Nodes save time and add realism.


    Part 1 – Setting the Foundation

    Scene Setup & Basic Structures

    1. Camera and Grid Setup
    • Start with a plane and switch to Geometry Nodes.
    • Add a grid node (size 50×50) to create a base for your terrain.
    • Position the camera at 20 meters height for a bird’s-eye view. Use a 100mm focal length for a cinematic zoom.
    1. Building the Window Frame
    • Create a plane, rotate it 90 degrees, and add loop cuts to carve out a window shape.
    • Use the Solidify Modifier to add thickness to the frame. Assign materials (wood for the frame, glass for panes) for realism.
    1. Interior Detailing
    • Add a table using a scaled plane with a solidify modifier.
    • Place a point light inside the room to simulate warm indoor lighting contrasting with the cold exterior.

    Pro Tip: Use Viewport Display Alpha to make materials semi-transparent for easier editing.


    Part 2 – Terrain, Bonfires, and Props

    H3: Snowy Terrain with Noise Textures

    1. Procedural Snow Layers
    • Add a Noise Texture node to a grid, using math nodes to control elevation.
    • Subtract 0.5 from the noise output to center terrain fluctuations.
    1. Creating a Bonfire
    • Model firewood using curves resampled into cylinders.
    • Add randomness to rotation and scale using Random Value nodes.
    • For flames, use a sphere with a noise-driven Set Position node to create organic shapes.
    1. Adding Characters
    • Import low-poly human models (FBX files) and position them around the bonfire.
    • Use Collection Info nodes to instance characters within Geometry Nodes.

    Key Takeaway: Combine Distribute Points on Faces with Instance on Points to scatter props like rocks or logs naturally.


    Part 3 – Final Touches: Trees, Lighting, and Materials

    H3: Crafting Winter Trees

    1. Procedural Pine Trees
    • Use curve-based trunks and instance icospheres as foliage.
    • Add randomness to branch angles and scales for variation.
    1. Snow-Covered Branches
    • Apply a White Emission material with subtle noise for frosty texture.

    Lighting and Atmosphere

    1. Exterior Lighting
    • Use a cold HDRI for ambient light.
    • Add area lights near the window to cast warm glows onto snow.
    1. Material Magic
    • Snow: Mix a white principled BSDF with a bump map from noise textures.
    • Ice: Use a glass BSDF with low roughness and a blue tint.

    Compositing for Realism

    • In the Compositor, add glare (Fog Glow) for firelight and adjust contrast to enhance shadows.
    • Follow techniques from YouTuber Robin Squares for cinematic post-processing.

    Key Takeaways

    • Geometry Nodes streamline repetitive tasks like terrain generation and prop scattering.
    • Noise Textures are essential for organic shapes (snow, flames, terrain).
    • Lighting Contrast (warm vs. cold) adds depth to winter scenes.
    • Procedural Materials reduce manual texturing work.

    Conclusion

    Blender’s Geometry Nodes unlock endless creativity for seasonal scenes. Whether you’re crafting a serene winter cabin or a bustling holiday village, this tutorial equips you with the skills to blend procedural efficiency with artistic flair. Now, grab a hot cocoa, fire up Blender, and let it snow! ❄️


    Learn to create a winter-themed diorama in Blender using Geometry Nodes! Step-by-step guide for terrain, props, lighting, and materials. Perfect for beginners.

    f

  • Trees on Splines – Powerful Geometry Node Asset Builder

    Trees on Splines – Powerful Geometry Node Asset Builder

    From Spline to Stand Out Scene: Mastering Procedural Tree Generation in Blender with Geometry Nodes

    Imagine sculpting an entire forest, not branch by painstaking branch, but swishing a hand through digital air and watching it blossom into life. This isn’t fantasy; this is the reality unlocked by Blender’s Geometry Nodes system, where organic beauty blooms from simple geometry.

    This tutorial delves deep into crafting mesmerizing trees – procedurally generated from your own hand-drawn splines – ready for immediate integration into any scene. We’ll explore each step of this powerful technique, transforming flat lines into vibrant, branching foliage with breathtaking realism.

    Setting the Stage: The Power of Geometry Nodes

    Before we dive into the enchanting world of pixelated flora, let’s grasp the foundational magic behind the curtain – Geometry Nodes themselves. They represent Blender’s revolutionary leap towards node-based procedural generation. Think of them as LEGO bricks for your 3D objects – you connect these nodes in logical chains, each performing a specific action on your geometry. From simple deformations to complex branching patterns, the possibilities are vast and intuitive.

    Geometry Nodes offer unparalleled control over mesh creation, allowing you to sculpt intricate shapes algorithmically, directly within Blender’s interface. This means:

    • Dynamic Design: Change parameters on the fly, watching your trees morph instantly – tweaking branch density, leaf size, or curvature with a slider click.
    • Endless Iteration: Experiment freely without sculpting fatigue! Want thicker trunks? More cascading branches? Tweak a node and watch it bloom.
    • Efficient Assets: Generate vast forests, each tree unique yet adhering to your defined style, saving precious time compared to hand-sculpting individual specimens.

    From Hand Sketch to Digital Forest: The Workflow Breakdown

    1. Foundation Splines

    • The Foundation: Your Splines (or Bezier Curves) Our journey starts with a foundation of elegant simplicity – the humble spline. In Blender’s default Curve Editing mode, create splines that capture the organic flow you envision for your tree trunk.
    • Geometry Nodes Unleashed: The Core Setup
      Select your curve (the future trunk). Press Shift + A and choose “Geometry Nodes” to introduce this node system into your scene.
    • Within the Geometry Nodes modifier, a new panel will appear – this is your playground! You’ll notice various nodes if you press Shift +A inside Geometry Nodes window, Mesh, Curve to Points, Spline Interpolation, etc. Don’t be intimidated by their names; they act like building blocks. We will press S after Shift+A to search for nodes we manually need, so we don’t need to worry about the others. Just follow the steps in the video tutorial.
    • Generating a basic shape using Curves to Mesh node, correcting the spline’s position manually (to make sure it’s vertical) in the Edit Mode and finally assigning the right radius to the top and bottom part of the spline.
    • Generating a basic shape using Curves to Mesh node, correcting the spline’s position manually (to make sure it’s vertical) in the Edit Mode and finally assigning the right radius to the top and bottom part of the spline.

    Once we setup a acceptable mesh for Bark, we will proceed to branch setup. We can always fine tune these details later. Make sure to provide Group Inputs for all the values we’ll need for editing in the future. Follow the steps in the video tutorial to understand how to use Group Inputs.

    2. Branching Out: From Splines to Branches

    • The magic happens with the “Instance on Points” node. This powerful tool interpolates the points on your hand drawn curve. It then maps the points to any additional input curves we feed (inside geometry nodes). Essentially creating a skeleton ready for branching development. In this case, we’ll be using the Quadratic Bezier as the Instance socket. This curve has abilities to bend easily. Which is what we’ll need for branch shaping.
    • Branch Density & Variation: The Art of Randomness
      • We want our tree to feel naturally grown, not rigidly identical branches at every point. To achieve this, introduce nodes like the “Noise Texture” and “Math” nodes. Think of noise texture as a virtual ripple effect over your points; it adds subtle variations in scale and direction, mimicking nature’s organic flow. The “Math” node then lets you manipulate these ripples – multiply them for more prominent branching, average them for smoother transitions between branches, or use other mathematical functions to achieve unique patterns.
    • What we generated was the level 1 branches. Using the same methods, we will generate level 2 branches. We will however first need to use a node called Realise Instances that will convert our level 1 branches from Instances to Curves.
    • We will use the same instance on points method to generate new, smaller curves on the level 1 curves.
    • For more details, follow the tutorials on exact steps done to achieve this. It also includes a reasoning for why we need the math nodes in addition to the Noise Texture.

    The Crown Jewel: Leaf Generation

    • Now that we have our skeletal framework of branches, it’s time to cloak it in foliage! We could go on to add third level of branches, but this comes at a risk of making it resource intensive. The idea behind this is to use this as an asset in our creative journey. Most of the times when we need trees in designs, we need more than one, right?
    • For leaves we will once again utilise “Instance On Points” node. This is your leafy arsenal – select a pre-made leaf and stem model, in the video tutorial you can find the method to design it.
    • After the instancing, we need to make sure to set the rotational orientation, sizing and movement correctly using the nodes we have setup in the Geometry nodes.

    Final Flourishes: Shaping & Texturing for Realism

    • For texturing, we will keep it simple since this is a beginner tutorial. I have already added an additional geometry nodes modifier that unwraps the UV for you, for those curious about how to UV unwrap effortlessly inside geometry nodes, checkout my other video about UV Unwrapper node.
    • Once we have the PBR based Materials setup, all we will need is to open the light settings and sun settings and begin designing the scene around it. The tree is done.

    This procedural approach unlocks possibilities beyond individual tree sculpting.

    • Forests at Your Fingertips: Generate entire groves with a single click. Tweak parameters and watch an expansive woodland take shape – each tree unique yet unified by your style.
    • Branching Out (Literally): Experiment with different spline shapes, adding complexity and visual interest to your forest floor with natural curves that flow through the landscape.
    • Ever-Expanding Possibilities: This technique isn’t limited to trees! Apply it to generate intricate plant vines, your imagination is the only limit!

    Note: Most of your editing on this will happen using the modifier properties inside Geometry Nodes of the Object “Trees on Spline”. My advice is to make 3-4 copies of that object, add it to a Collection in your Outliner and then use the Collection Info node to bring it into a geometry node tree. Then use the Instance on Point method to spawn trees on any surface. If you set their individual rotations, settings far apart then you are essentially generating a forest.

    So why wait? Dive into Blender’s Geometry Nodes system, unleash your inner artist, and watch forests flourish from simple lines. The possibilities are as boundless as the natural world itself!