
From Spline to Stand Out Scene: Mastering Procedural Tree Generation in Blender with Geometry Nodes
Imagine sculpting an entire forest, not branch by painstaking branch, but swishing a hand through digital air and watching it blossom into life. This isn’t fantasy; this is the reality unlocked by Blender’s Geometry Nodes system, where organic beauty blooms from simple geometry.
This tutorial delves deep into crafting mesmerizing trees – procedurally generated from your own hand-drawn splines – ready for immediate integration into any scene. We’ll explore each step of this powerful technique, transforming flat lines into vibrant, branching foliage with breathtaking realism.
Setting the Stage: The Power of Geometry Nodes
Before we dive into the enchanting world of pixelated flora, let’s grasp the foundational magic behind the curtain – Geometry Nodes themselves. They represent Blender’s revolutionary leap towards node-based procedural generation. Think of them as LEGO bricks for your 3D objects – you connect these nodes in logical chains, each performing a specific action on your geometry. From simple deformations to complex branching patterns, the possibilities are vast and intuitive.
Geometry Nodes offer unparalleled control over mesh creation, allowing you to sculpt intricate shapes algorithmically, directly within Blender’s interface. This means:
- Dynamic Design: Change parameters on the fly, watching your trees morph instantly – tweaking branch density, leaf size, or curvature with a slider click.
- Endless Iteration: Experiment freely without sculpting fatigue! Want thicker trunks? More cascading branches? Tweak a node and watch it bloom.
- Efficient Assets: Generate vast forests, each tree unique yet adhering to your defined style, saving precious time compared to hand-sculpting individual specimens.
From Hand Sketch to Digital Forest: The Workflow Breakdown
1. Foundation Splines
- The Foundation: Your Splines (or Bezier Curves) Our journey starts with a foundation of elegant simplicity – the humble spline. In Blender’s default Curve Editing mode, create splines that capture the organic flow you envision for your tree trunk.
- Geometry Nodes Unleashed: The Core Setup
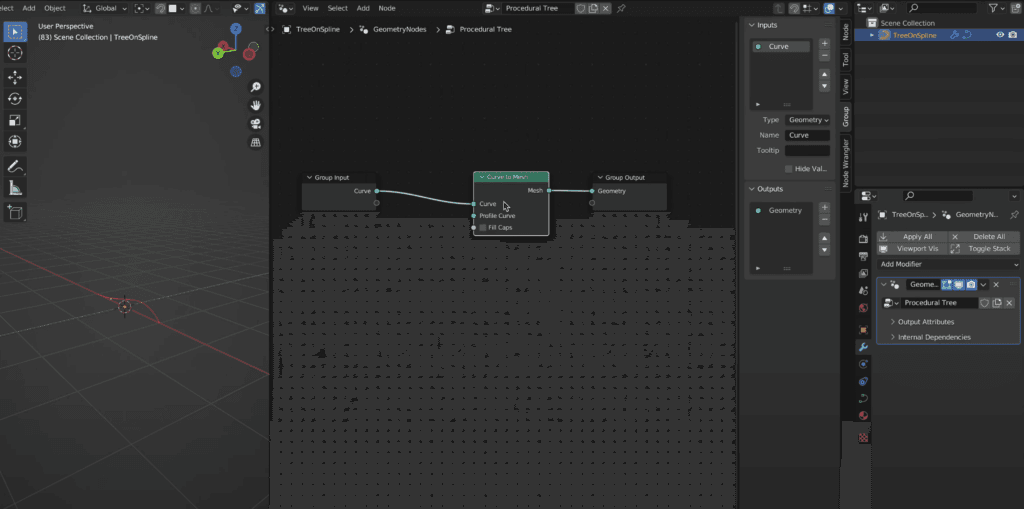
Select your curve (the future trunk). Press Shift + A and choose “Geometry Nodes” to introduce this node system into your scene. - Within the Geometry Nodes modifier, a new panel will appear – this is your playground! You’ll notice various nodes if you press Shift +A inside Geometry Nodes window, Mesh, Curve to Points, Spline Interpolation, etc. Don’t be intimidated by their names; they act like building blocks. We will press S after Shift+A to search for nodes we manually need, so we don’t need to worry about the others. Just follow the steps in the video tutorial.
- Generating a basic shape using Curves to Mesh node, correcting the spline’s position manually (to make sure it’s vertical) in the Edit Mode and finally assigning the right radius to the top and bottom part of the spline.
- Generating a basic shape using Curves to Mesh node, correcting the spline’s position manually (to make sure it’s vertical) in the Edit Mode and finally assigning the right radius to the top and bottom part of the spline.
Once we setup a acceptable mesh for Bark, we will proceed to branch setup. We can always fine tune these details later. Make sure to provide Group Inputs for all the values we’ll need for editing in the future. Follow the steps in the video tutorial to understand how to use Group Inputs.
2. Branching Out: From Splines to Branches
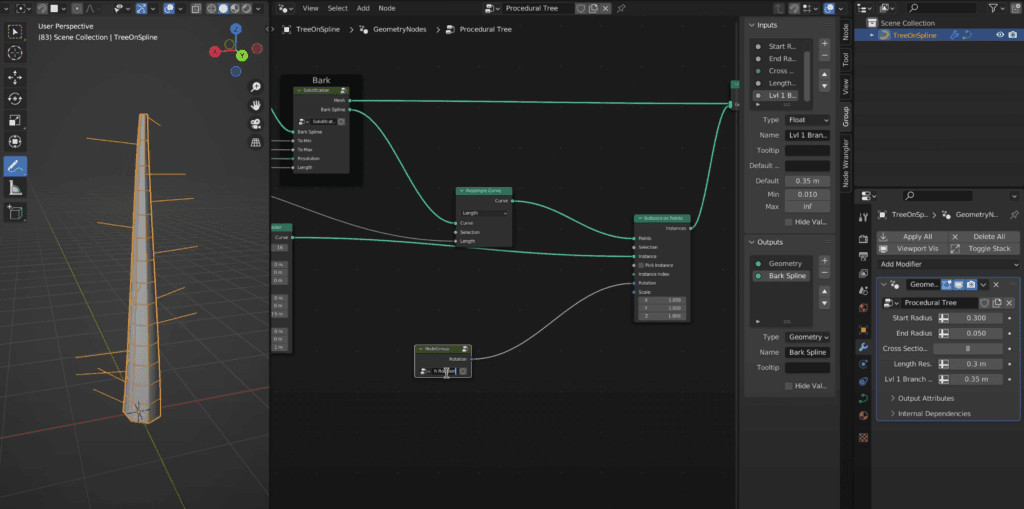
- The magic happens with the “Instance on Points” node. This powerful tool interpolates the points on your hand drawn curve. It then maps the points to any additional input curves we feed (inside geometry nodes). Essentially creating a skeleton ready for branching development. In this case, we’ll be using the Quadratic Bezier as the Instance socket. This curve has abilities to bend easily. Which is what we’ll need for branch shaping.
- Branch Density & Variation: The Art of Randomness
- We want our tree to feel naturally grown, not rigidly identical branches at every point. To achieve this, introduce nodes like the “Noise Texture” and “Math” nodes. Think of noise texture as a virtual ripple effect over your points; it adds subtle variations in scale and direction, mimicking nature’s organic flow. The “Math” node then lets you manipulate these ripples – multiply them for more prominent branching, average them for smoother transitions between branches, or use other mathematical functions to achieve unique patterns.
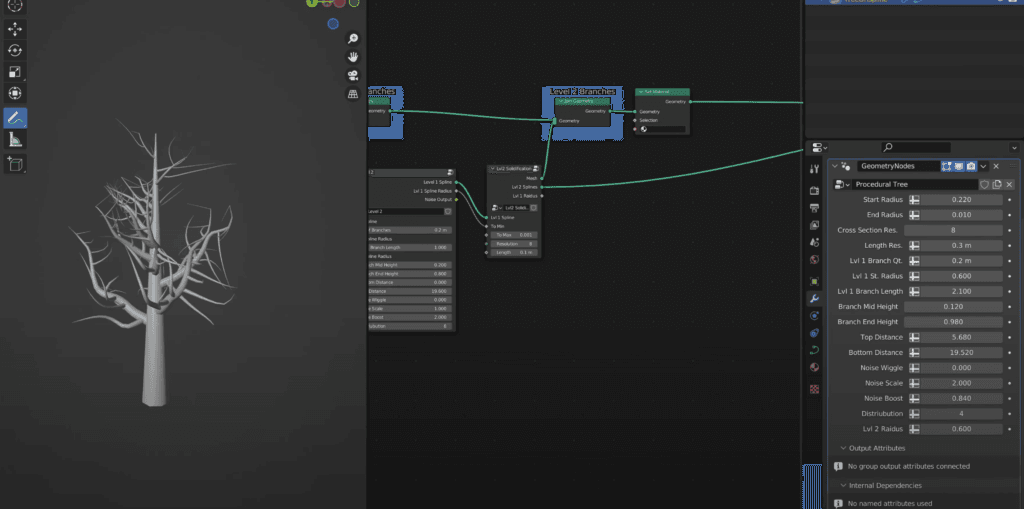
- What we generated was the level 1 branches. Using the same methods, we will generate level 2 branches. We will however first need to use a node called Realise Instances that will convert our level 1 branches from Instances to Curves.
- We will use the same instance on points method to generate new, smaller curves on the level 1 curves.
- For more details, follow the tutorials on exact steps done to achieve this. It also includes a reasoning for why we need the math nodes in addition to the Noise Texture.
The Crown Jewel: Leaf Generation
- Now that we have our skeletal framework of branches, it’s time to cloak it in foliage! We could go on to add third level of branches, but this comes at a risk of making it resource intensive. The idea behind this is to use this as an asset in our creative journey. Most of the times when we need trees in designs, we need more than one, right?
- For leaves we will once again utilise “Instance On Points” node. This is your leafy arsenal – select a pre-made leaf and stem model, in the video tutorial you can find the method to design it.
- After the instancing, we need to make sure to set the rotational orientation, sizing and movement correctly using the nodes we have setup in the Geometry nodes.
Final Flourishes: Shaping & Texturing for Realism
- For texturing, we will keep it simple since this is a beginner tutorial. I have already added an additional geometry nodes modifier that unwraps the UV for you, for those curious about how to UV unwrap effortlessly inside geometry nodes, checkout my other video about UV Unwrapper node.
- Once we have the PBR based Materials setup, all we will need is to open the light settings and sun settings and begin designing the scene around it. The tree is done.
This procedural approach unlocks possibilities beyond individual tree sculpting.
- Forests at Your Fingertips: Generate entire groves with a single click. Tweak parameters and watch an expansive woodland take shape – each tree unique yet unified by your style.
- Branching Out (Literally): Experiment with different spline shapes, adding complexity and visual interest to your forest floor with natural curves that flow through the landscape.
- Ever-Expanding Possibilities: This technique isn’t limited to trees! Apply it to generate intricate plant vines, your imagination is the only limit!
Note: Most of your editing on this will happen using the modifier properties inside Geometry Nodes of the Object “Trees on Spline”. My advice is to make 3-4 copies of that object, add it to a Collection in your Outliner and then use the Collection Info node to bring it into a geometry node tree. Then use the Instance on Point method to spawn trees on any surface. If you set their individual rotations, settings far apart then you are essentially generating a forest.
So why wait? Dive into Blender’s Geometry Nodes system, unleash your inner artist, and watch forests flourish from simple lines. The possibilities are as boundless as the natural world itself!